
We have no documentation for scissor cases dating back to the 1600's. We know scissors were included in sewing baskets, but there is no sign, to my knowledge, of covers specifically for snips (so defined as being able to only hold one finger in each opening) or shears (defined as holding more than one finger in at least one opening). In the 1700's there are needlework boxes which have a specific section for the snips, but no separate covers. In the 1800's we begin to see rectangular covers for scissors in both embroidered paper and cloth. In the 1900's begin to see covers which are shaped to the snips themselves. That being said, it is always good to have something that protects the blades of your scissors.
When doing a Florentine Stitch or Hungarian Point pattern it is easy enough to make compensating stitches that fit the flow of the pattern to accommodate a curve or edge of the item. To do this your continue the pattern, but stop the stitch short of the edge. Thus, a run which should be 6 threads may only be 2 threads, but the color and placement of the stitch is correct.
The following patterns will work on any count canvas or linen. The key is to choose a thread that will ensure that there is complete coverage of the fabric in questions. Determining the appropriate thread for coverage is always a matter of trial and error. A single thread of Appleton wool will cover differently than a single thread of Paternayan wool. A single thread of Eterna silk will cover differently than a single thread of Splendor silk. Thus I will leave the final choice of fabric and thread up to you.
When making your choices remember that historically a piece may be linen, wool or silk thread or a mixture of these threads. Also slips were frequently done on approximately 25 count linen canvas.
draw 2 rectangles each 2 inches wide and 4 inches long on your
canvas
work the Florentine pattern on one rectangle and the Hungarian
Point on the other, filling the 2x4" rectangles
work one row of long arm cross stitch all the way around each
of the rectangles in one of the darker threads
cut out each rectangle leaving enough space around each to turn
under (approximately 1/2")
fold the excess under and stitch the 2 rectangles together on
3 sides with another row of long arm cross stitch which cover
the joins
line the scissor case with a thin but tightly woven fabric such as a fine muslin to protect the backs of the embroidery and prevent your scissors from catching on the fibers.
tack the lining in place.
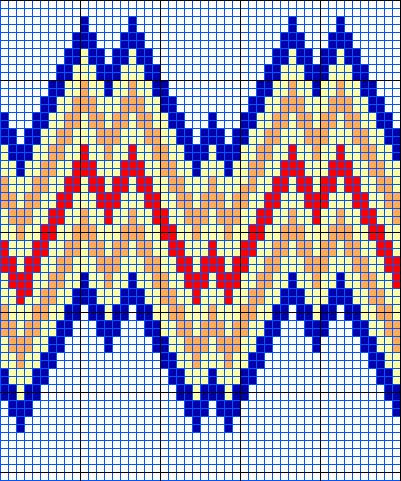
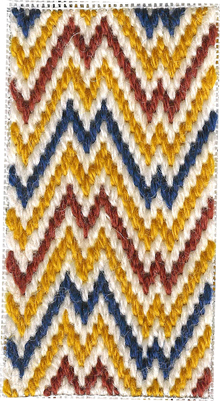
This is adapted from the V&A English Sampler from the 2nd quarter of the 17th C. It is a simple 4:2 pattern over 4 threads and the next stitch begins up or down by 2 threads.
The lines should be stitched in the following color order:
medium blue, cream, antique gold, cream, red, cream and then the
pattern repeats beginning with blue.
Dark = medium blue
Light = cream
Light Grey = gold
Dark Grey = red


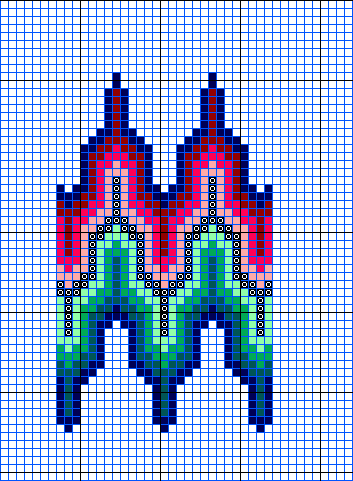
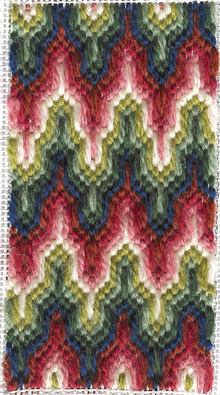
This 6:1 pattern is not identified in any of the aforementioned pieces. Unfortunately the Hungarian Point patterns in them are all designed to cover large areas and so the repeating pattern effect cannot be seen on such a small piece. Thus, here is a basic Hungarian Point pattern to give you some concept of how the patterning works.
Remember that one key part of Hungarian Point is the use of color. In the pattern here, there are 2 key color palates pink and green with blue as the accent color. You should feel free to substitute your own choice of color palate such as blue and grey or orange and gold.
The lines should be stitched in the following color order:
dark blue, wine, dark pink, medium/light pink, cream, light green,
medium green, dark green and then the pattern repeats beginning
with blue.
Dark = dark blue
1st Dark Grey = wine 2nd Dark Grey = dark green
1st Medium Grey = dark pink 2nd Medium Grey = medium green
1st Light Grey = medium light pink 2nd Light Grey = light green
o = cream


Return to the Main Page for Bayrose.org
All Rights to Pictures and Text Reserved by Robin L. Berry, unless noted otherwise - 2007.